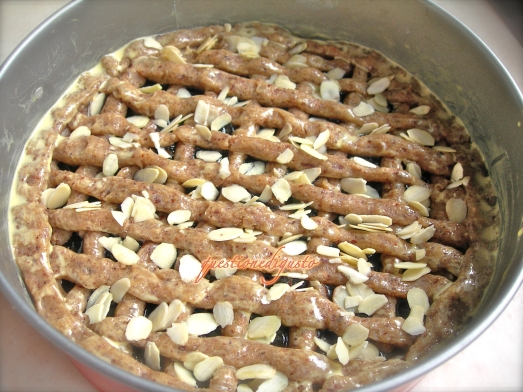
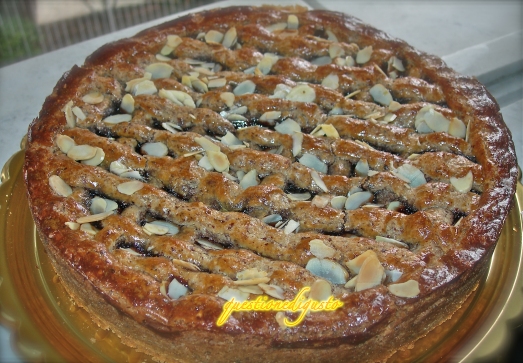
Linzer Torte, il giusto compromesso tra una torta e una crostata…

linzfinita

La mia relazione intima con il forno inizia ad avere i giorni contati. Il caldo che, nell’ultima settimana, mi ha permesso di indossare le prime magliette a maniche corte, è lo stesso che mi imporrà una pausa dalle temperature eccessive in cucina, ma tanto per cogliere al volo le ultime occasioni, un compleanno mi ha fornito la scusa di testare un dolce che mi ronzava in testa dai tempi dei tempi: la Linzer Torte.

Quando ho optato per questo regalo, è stato inevitabile, curiosare sul web per risalire alle origini e scoprire che la Linzer Torte è forse una delle torte-crostata, che rendono famosa la pasticceria austriaca e in particolare la città di Linz, ma non immaginavo certo si trattasse della ricetta dolce più antica conosciuta al mondo (solitamente apro il frigo, controllo quali sono gli ingredienti che vanno assolutamente consumati e da lì inizio a decidere su cosa monopolizzare la mia attenzione, più semplice indubbiamente); si parla addirittura, di metà Seicento, e di un’origine non proprio austriaca, bensì veronese (tanto lo sapevo, che quando si tratta di dolci, mi dispiace, ma la nostra pasticceria è di un altro livello).

Per il primo test mi sono affidata alla ricetta originale che ho trovato qui, optando per alcune semplici modifiche (anziché grattugiare le nocciole, ho usato direttamente della farina di nocciole, ho evitato la vaniglia, ma non ho lesinato con le altre spezie ed infine ho seguito il suggerimento di un’amica, che mi ha consigliato di utilizzare un foglio d’ostia prima di versare la marmellata così da ottenere una cottura perfetta della frolla).

Ricetta Originale per la Linzer Torte (fonte Linz saluta )

150 g burro
250 g farina 00 (io ho utilizzato della semplice 0)
150 g zucchero a velo
100 g nocciole arrostite  (o farina di nocciole)
1 uovo
spezie (vaniglia, scorza di limone, 1 cucchiaino di cannella, 1/2 cucchiaino di polvere di chiodi garofano)
10 g lievito in polvere
300 g marmellata di ribes  (io ho usato quella di amarene, e per non far bagnare la frolla, anche un foglio d’ostia)

Unite la farina al lievito e poi con quella di nocciole, poi lo zucchero e le spezie. Dopo aver mescolato bene, cominciate ad aggiungere il burro a cubetti e successivamente la scorza di limone. In ultimo aggiungete l’uovo, ed impastate il tutto fino ad ottenere un composto liscio ed omogeneo, che lascerete riposare in frigo per almeno un’ora.

Foderate con della carta forno una tortiera (possibilmente a cerniera, così da faticare di meno e non rompere la frolla), su cui adagerete tre quarti della pasta, che avrete lavorato fino a raggiungere circa 1,5 cm di spessore e coprite completamente il fondo della torta con il foglio di ostia, che avrete ritagliato adattandolo al vostro cerchio di base (Se trovate le cialde piccole va bene lo stesso). A questo punto, ho distribuito l’ultimo barattolo di marmellata di amarene, fatta in casa lo scorso anno, poi con il restante impasto, ho fatto dei rotolini sottili per comporre la grata della crostata, lasciandone un ultimo più largo per i bordi esterni. Spennellate la superficie con del tuorlo ed in ultimo disponete, le lamelle di mandorla nei fori in cui spunta la marmellata.

Mettete a forno per 40–45 minuti a circa 190 gradi. E se volete, anche se la ricetta non lo prevede, una volta sfornata potete spolverare la vostra torta con dello zucchero a velo.

Assaggiate e ditemi… è più italiana o austriaca?

tourismus_41(foto ufficio Turismo di Linz)

My intimate relationship with the oven started its countdown. The heat in the last week, which allowed me to wear the first short-sleeved shirts, it is the same that will impose me a break from excessive temperatures in the kitchen, but just to seize upon the latest bargains, the excuse came up due to a birthday, so I was able to test a cake that was buzzing in my head since centuries: the Linzer Torte.

When I opted for this gift, it was inevitable, to browse a bit the web to go and find the roots of the Linzer Torte: perhaps one of the pies-tarts, which makes famous the Austrian pastries and especially the city of Linz, but I never imagined that this was the oldest dessert recipe known in the world (how I make a decision about the cake to bake ?? Usually I open the fridge, check what are the ingredients that need absolutely to be consumed and from there, I begin to decide on what I can bake… undoubtedly the simplest way!), something like  mid-seventeenth century, and documents tell that arrives not from Linz, but Verona (when it comes to cakes and pastries, I’m sorry, but our tradition is a bit more winning).

For the first test, I have relied on the original recipe that I found here, opting for some simple changes (instead of grated hazelnuts, I used directly the hazelnut flour, I avoided the vanilla, but I did not skimp with the other spices and following the suggestion of a friend, I useD a sheet of wafer before pouring the jam so as to obtain the perfect cooking of the pastry).

Original Recipe for Linzer Torte (source Linz Tourist Office)

150 g butter
250 g 00 flour (I used the simple 0)
150 g icing sugar
100 g roasted hazelnuts (or hazelnut flour)
1 egg
spices (vanilla, lemon zest, 1 teaspoon cinnamon, 1/2 teaspoon of ground cloves)
10 g baking powder
300 g  homemade cherry jam (I used the black cherry, and so as not to wet the pastry, even a sheet of wafer)

Combine the flour with the baking powder with the nuts, then the sugar and spices. After mixing well, start adding the butter into cubes and then the lemon zest. Finally add the egg, and knead together until the mixture is smooth and homogeneous, let it rest in the fridge for at least an hour.

Lined with paper baking a cake pan (preferably hinged, so as to save effort and not break the crust), where you will put the three-quarters of the dough, which you have worked up to about 1.5 cm in thickness and completely cover the bottom cake with sheet of wafer, which you cut to best fits at your basic circle (If you find the small pods that’s okay either, less work). At this point, I distributed the last jar of cherry jam, homemade last year, then with the remaining dough, I made thin rolls to create the grate of the tart, leaving a final wider for the outside edges. Brush the surface with egg yolk and finally you put the sliced ​​almonds into the holes where the jam comes out.

Put in the oven for 40-45 minutes at about 190 degrees. And if you want, even if the recipe does not mention it, once baked your cake you can dust with icing sugar.

Try and tell me … is more Italian or Austrian?
 
 linzcruda

Tempo di fragole…e panna!!! Strawberry time … and whipped cream!!!

La fragola è uno di quei frutti, che mi riporta indietro nel tempo. Difficile trovare qualcuno che non ne abbia mai fatto una scorpacciata, ancor più difficile immaginare una montagna di panna fresca in cui tuffare queste delizie e resistere alla tentazione di afferrare un cucchiaino!

Questa torta nasce proprio dalla voglia di assaporare al meglio questa combinazione e delle consistenze diverse, un profumo che difficilmente può esser confuso con altri e che annuncia l’arrivo della stagione del sole (poetica quanto basta da avervi fatto alzare la glicemia già così? Perdonate!)

Comunque se siete alla ricerca di una torta veloce e dall’effetto sicuro, che va bene per un compleanno come per un’occasione speciale fra amici, questa ricetta fa al caso vostro.

Per il pan di spagna: 2 uova – 90 grammi di farina – 15 grammi di fecola – 100 grammi di zucchero – mezzo cucchiaino di lievito

Per la farcia di panna e fragole 250 ml di panna fresca – 250 grammi di fragole – mezzo succo di limone

Tenere delle fragole intere per la decorazione finale

Lavorate con la frusta zucchero e uova fino ad ottenere un composto chiaro e spumoso. Aggiungete a questo, la farina setacciata con la fecola ed il lievito, facendo attenzione a mescolare con delicatezza, per mantenere soffice il composto.

Infornate in forno caldo a 180° per 15 – 20 minuti.

Sfornate il pan di spagna e lasciate raffreddare.

Nell’attesa tagliate le fragole a tocchetti e spruzzate sopra il succo di limone, aggiungendo un cucchiaino di zucchero, per farle macerare un pò. Montate con le fruste la panna (che avrete tenuto in frigorifero fino all’ultimo momento), lasciatene il necessario per coprire la torta (un pò più della metà) e unite al resto, le fragole senza lo sciroppo, mescolando bene.

Una volta che il pan di spagna è pronto, dividetelo in due (o in tre) e bagnatelo con il succo delle fragole, magari allungato con un po’ d’acqua o con del liquore se il dolce è mangiato solo da adulti: a questo punto, coprite la superficie con il vostro mix di panna e fragole, chiudete con l’altra metà, bagnate nuovamente con lo sciroppo ottenuto dalle fragole e ricoprite con tanta panna.

A piacere potrete decorare con fettine sottili di fragole (quelle che avrete lasciato da parte) e ciuffetti di panna, ma a voi il tocco finale…

Strawberry is one of those fruits, which brings me back in time. Hard to find someone who can say “no thanks, don’t like them”, even more difficult to imagine a mountain of fresh whipped cream in which to dip these delights and resist the temptation to grab a spoon!

This cake is born from the desire to taste at its best this combination of textures, a scent that can hardly be confused with others, and announcing the arrival of the season of the sun (poetic enough to raise your blood sugar already having done so? Forgive me if you can!)

However if you are looking for a cake fast  to make and something lovely to show to your guests, which is fine for a special occasion like a birthday or a dinner with friends, this recipe is what you are looking for.

For the sponge cake you will need : 2 eggs – 90 grams of flour – 15 grams of starch – 100 grams of sugar – half a teaspoon of baking powder

For the filling of cream and strawberries: 250 ml of fresh cream – 250 grams of strawberries – half lemon juice

(Keep some whole strawberries for final decoration)

Work  sugar and eggs with a whisk until mixture is light and fluffy. Add in the sifted flour with the starch and yeast, stir gently, being careful to keep the mixture soft.

Bake in preheated oven at 180 degrees for 15 to 20 minutes. Let it cool.

In the meantime, cut the strawberries into small pieces and sprinkle over the lemon juice, adding a teaspoon of sugar, to obtain the natural syrup after a while. Whip the cream with the whisk (which you kept in the refrigerator until the last moment), leave the quantity you need to cover the cake (a little over half) and add the strawberries without the syrup in the rest of it, stirring well.

Once the sponge cake is ready, divide it into two (or three) and moisten with the juice of strawberries, maybe mixed with a little of water or liquor if the cake is eaten by adults only: at this point, cover the surface with your mix of cream and strawberries, close with the other half, wet again with the strawberries’ syrup and cover with a lot of simple whipped cream.

A pleasure you can decorate with thin slices of strawberries (those left aside) and tufts of whipped cream, but the choice is yours… Just enjoy!

Una torta di mele da far invidia a Nonna Papera… GrandMa Duck would love this Apple Cake…

Ogni volta che si parla di torta di mele, la prima immagine che mi torna in mente, è la tenera Nonna Papera, che sforna la sua teglia fumante e la poggia sul davanzale della finestra di casa, per farla raffreddare…ma puntualmente un orso ghiotto la fa sparire!

Così quando ho provato questa ricetta (presa da un ricettario diverso da quello della nonnina pennuta), ho sperato che il risultato fosse altrettanto gustoso e profumato, e a detta di molti, la consistenza morbida ed umida delle mele, lasciate a riposare nel limone, ha colto nel segno!

Per questa ricetta avrete bisogno di:

1 kg di mele (pink lady)

200 grammi di farina 00

150 grammi di zucchero

qualche fiocchetto di burro per imburrare la teglia e da mettere sulla torta

2 uova

2 dl di latte

1 bustina di lievito per dolci

la scorza grattugiata di mezzo limone ed il succo

2 cucchiai di pangrattato

1 cucchiaio di zucchero a velo

Sbucciate le mele (tenendone un paio da sbucciare solo alla fine della preparazione) e tagliatele a cubetti, immergendole nel succo di limone per non farle scurire.

Sbattete con la frusta, zucchero e uova finché il composto non sarà gonfio e spumoso.

Unite al composto la farina setacciata, il latte, la scorza di mezzo limone ed infine il lievito: amalgamate bene il tutto ed aggiungete i cubetti di mela per distribuirli in tutto il composto.

Imburrate una tortiera, cospargetela con il pangrattato e versatevi il composto: a questo punto, sbucciate le mele che avrete tenuto da parte, e disponete a raggiera le fettine sottile, distribuendo per finire, qualche fiocchetto di burro sulla torta.

Infornate in forno caldo a 170° e fate cuocere per 50-60 minuti.

Una volta che la torta si è raffreddata, sformate e spolverizzate con zucchero a velo.

Ed ora non resta che mordere come farebbe un orso affamato 🙂 …

Every time I hear talking about apple pie, the first image that comes to my mind is Grandma Duck (an Italian character from Walt Disney that unfortunately most of the other people doesn’t know about) baking her great one, turning out her steaming pan from the oven and putting it on the windowsill  to cool … but often here comes an hungry bear that gets rid of it!

So when I tried this recipe (taken from a cookbook different from the famous GrandMa Duck’ one), I hoped the result was equally delicious, fragrant: according to our guests, the soft texture of the apples, leave to rest in the lemon, has hit the mark!

For this recipe you will need:

1 kg of apples (pink lady quality if possible)

200 grams of flour 00

150 grams of sugar

some butter for greasing the pan and put on the cake

2 eggs

2 cups of milk

1 packet of baking powder

grated rind and juice of ½ lemon

2 tablespoons of breadcrumbs

1 tablespoon powdered sugar

Peel the apples (keeping a few to peel only at the end of preparation, so that they won’t get dark) and cut into cubes, dipping them in lemon juice to prevent them from darkening.

Beat with a whisk, sugar and eggs until the mixture is puffy and fluffy.

Melt together with eggs mixture, the sifted flour, milk, lemon zest and then yeast: mix well and add the apple cubes to the dough.

Grease a cake pan, sprinkle with breadcrumbs and pour the mixture: at this point, peel the rest of the apples and slice them thin to cover the dough, distributing on top of them a few knobs of butter.

Bake in preheated oven at 170 degrees for 50-60 minutes.

Once the cake has cooled, sprinkle with powdered sugar.

And now you just have to bite the way a hungry bear will… 🙂

Torta al cioccolato e caffé, un buon compromesso per una pausa pomeridiana…Chococoffee cake for an afternoon break…

Domenica è sempre domenica. Il tempo, soprattutto quando viene sottratta un’ora, assume un’importanza diversa. C’é voglia di relax, pace, un ritmo diverso. E questa torta, non lievitata, che si accompagna bene ad un caffé, è forse la ricetta che assomiglia di più, ad una giornata così.

Di veloce realizzazione, vi serviranno: 200 grammi di cioccolato fondente, mezza tazzina di caffé ristretto, 80 grammi di burro, 100 grammi di zucchero a velo e 3 uova.

Tagliate il cioccolato a pezzetti e fatelo fondere a bagnomaria con il burro. Trasferite il composto in una ciotola capace e lasciate intiepidire. Aggiungete il caffé ed incorporate 80 grammi di zucchero a velo e le uova, uno alla volta.
Mettete il composto in uno stampo ricoperto con carta forn, infornate a 180° per circa 25 minuti e poi lasciate nel forno spento altri 5 minuti.
Cospargete con zucchero a velo e servite! Buona pausa a tutti 🙂

Sunday is always a special day. The time, especially when you can count on 1 hour less, has a different importance. I feel the need to relax, stay peacefully on the sofa, have a different pace. And this cake, simple and easy to bake, and which goes well with coffee, is perhaps the recipe is more similar to such a day.
To prepare it you will need: 200 grams of dark chocolate, half coffee cup of strong coffee, 80 grams of butter, 100 grams of powdered sugar and 3 eggs.Cut the chocolate into pieces and melt in double boiler with butter. Transfer the mixture into a capable bowl and let cool. Add the coffee and incorporated80 grams of sugar and the eggs, one at a time.

Put the mixture into a mold covered with parchment paper, bake at 180 degrees for about 25 minutes and then let off in the oven another 5 minutes.

Sprinkle with powdered sugar and serve! Have a lovely resting Sunday everybody 🙂

Il mio dolce preferito… My favourite cake…

A questo punto si sarà capito: adoro i dolci e le preparazioni al forno! Detto questo, cucino un po’ di tutto, ma starvi a raccontare di come faccio l’insalata, non è lo stesso, che raccontarvi di come ho finalmente superato uno dei più grandi ostacoli, che faceva vincere il forno su tutta la linea: la preparazione degli choux! Ho provato tante ricette, ho cercato di capire cosa non andasse nel momento in cui aprendo lo sportello del forno, gli stupendi bigné crollassero senza possibilità di sorta, finché non è arrivata una puntata provvidenziale di “Dolcemente” su Gambero Rosso Channel, a salvarmi e a darmi modo di superare il limite della pasta choux… Non nascondo che sono felice di poter legare ancora una volta, la buona riuscita di un dolce al bravissimo Maurizio Santin, soprattutto perché si tratta del mio dolce preferito ed è inutile aggiungere anche le giravolte che ho fatto, nel momento dell’assaggio…
La ricetta non è semplice, ma seguendola scrupolosamente il risultato è garantito, e soprattutto i bigné riescono alla perfezione!
Per rifare il Profiterole di Santin vi servirà:
per la Pasta choux (ricetta di Ugo Alciati)
210 ml acqua
90 g margarina
90 g farina setacciata
170 g uova intere
1 g lievito
q.b. sale
per la Glassa a specchio
250 ml acqua
200 g cioccolato fondente
40 g burro
2 cucchiai cacao
Per la Chantilly al cioccolato (io stavolta ho utilizzato della semplice panna montata per il ripieno)
200 g cioccolato al 55%
200 g panna
1) Pasta choux
Mettere a scaldare l’acqua, aggiungere il sale e la margarina.
Quando l’acqua ha preso bollore aggiungere la farina, poca alla volta, nel centro della pentola. Mescolare con la frusta, poi passare alla spatola. Quando l’impasto si stacca perfettamente dalle pareti è pronto. Versare nella planetaria e allargare l’impasto sulle pareti per farlo intiepidire. Iniziare a lavorare, aggiungendo un uovo alla volta. Prima di mettere l’impasto nella sacca da pasticcere aggiungere il lievito (giusto la punta di un coltello). Foderare la teglia con della carta forno e formare i bignè. Mettete il tutto in forno a 190°/200° fino a colorazione.
Una volta che i bigné saranno freddi, forare con la punta di un coltellino.
2) Glassa a specchio
Mettete l’acqua a scaldare, aggiungete il cioccolato e mescolate facendo sciogliere. Aggiungete il cacao e mescolate bene, ed in ultimo, sempre mescolando, aggiungete il burro. Versate in una ciotola e fate raffreddare fino all’uso.
3) Chantilly al cioccolato
Sciogliete il cioccolato a bagnomaria. Montate la panna e versatela tutta in un colpo nel cioccolato, mescolando energicamente fino ad avere un composto liscio e omogeneo,  facendo attenzione a non far indurire la crema.
Versate la crema in una sac-a-poche e riempite i bignè. (Io ho saltato questo passaggio, perché volevo un ripieno semplice di golosa panna montata).
In ultimo, la Composizione
Appoggiate uno strato di bignè su un piatto (se utilizzate quelli in plastica da pasticceria con i bordi alti, vi aiuterete non poco) e ricopriteli con la glassa, fate un altro strato e ricoprite…fino a che il risultato non vi soddisferà!
Mettete in frigorifero e prima di servire, decorate con ciuffetti di panna montata.
Sono sicura che anche per voi, sarà un successo da applausi!! Grazie Santin!!!
I imagine that if you are reading my blog, you got the clue: I love cakes and baked preparations!  I cook a bit of everything, but I will feel clumsy to write you how to prepare a fresh salad here, because this space is a kind of special corner, where I share my little cooking’ big scores, and like in this case, where I tell you how I finally passed one of the biggest obstacles: the preparation of choux! I’ve tried many recipes, I tried to figure out what was wrong when opening the oven door, the wonderful cupcake collapsed without any possibility of some sort, until I watched an episode of “Dolcemente” on Gambero Rosso Channel (Chef Maurizio Santin is the host of this great tv show on cakes and sweet recipes), where like a miracle, the recipe was the one of my favourite cake, the Profiterole one,  and with this recipe, I finally overcome my limits with choux pastry …The recipe is simple but complex, you should be carefully following it step by step, but the result is guaranteed, and especially the choux fail to perfection!For this recipe you will need:
For the choux dough (the recipe belongs to another famous Italian chef as Ugo Alciati)
210 ml water
90 g margarine
90 g flour, sifted
170 g whole eggs
1 g yeast
q.b. salt

Chocolate Icing
250 ml water
200 g dark chocolate
40 g butter
2 tablespoons of cocoa

For the Chantilly Choco Cream (this time I used simply whipped cream for the filling, but this Chantilly is gorgeous!)

200 g chocolate 55%
200 g fresh milk cream

1) Choux dough
Put water to boil, add salt and margarine.
When the water starts boiling, add the flour, little at a time, in the center of the pot. Stir with a whisk, then move to the spatula. When the mixture is completely detached from the walls of the pot, is ready. Pour the mixture into the mixer and expand on the walls to make it cool. Start working, adding one egg at a time. Before putting the mixture into pastry bag, add the yeast (just the tip of a knife). Lining the pan with greaseproof paper and form the cream puffs. Place in oven at 190 ° / 200 ° until staining.
Once the puffs are cool, pierce with the tip of a boxcutter.

2) Choco Glaze or Icing
Put the water to boil, add the chocolate and stir to melt. Add the cocoa and mix well, and finally, stirring constantly, add the butter. Pour into a bowl and keep cool until use.

3) Chocolate Chantilly
Melt the chocolate in a bain-marie. Whip the cream and pour in the chocolate all at once, stirring vigorously until the result will be smooth and uniform, being careful not to harden the cream.
Pour the cream into a sac-a-poche and fill your cream puffs. (I skipped this step, because I wanted a simple whipped cream filling)

Finally, the composition:
Place a layer of cream puffs on a plate (if you use plastic ones with high edges for  pastry purposes, you will help yourself alot!) and cover them with the chocolate icing, make another layer and cover … until the result will satisfy you!
Refrigerate before serving, decorated with tufts of whipped cream when you present the cake to your friends.

I’m sure that for you, too, this will be a success with applause! Mr. Chef Santin Thanks a million!

Una torta ricotta e pere da farmi ricredere… A delicious cake that you can’t resist to…

Ero alla ricerca di una ricetta ben precisa, quella della torta ricotta e pere, e sapendo che i dolci con la ricotta non sono tra i miei preferiti (non mi piace sentir troppo la ricotta), mi sono affidata totalmente alla ricerca in rete…E’ così che ho scoperto un sito di ricette splendido come quello de La Ciliegina sulla Torta: grafica pulita (sì proprio come dovrei decidermi a fare qui), un gusto delicato e squisito, ricette da capogiro… Insomma, nonostante la ricetta in questione, fosse poi tratta e riadattata dal “I dolci del sole” di S. De Riso (e la cosa mi spaventa già solo al pensiero, visto che quando dei valenti pasticceri ti concedono qualcuno dei loro segreti, come minimo ti ritrovi con un disastro in cucina, che non assomiglia neanche lontanamente all’originale!), un po’ per la disperazione, un po’ per il poco tempo a disposizione, mi sono fatta coraggio e meraviglia delle meraviglie, questo dolce è stato portentoso!!!

Per la ricetta vi rimando al sito suddetto, la mia unica variazione è stata quasi imposta: non avendo trovato il distillato di pere, ho aguzzato l’ingegno e per mantenere il sapore della pera, ho utilizzato del succo di pere biologico aggiungendo un goccio di rum bianco per dargli un gusto adulto (credo che anche un goccio di grappa avrebbe funzionato benissimo).

In ultimo, se come me vi ritrovate senza il cerchio per assemblare il dolce, io ho utilizzato una semplice tortiera di 22 cm con apertura a gancio, e montato il dolce seguendo le istruzioni.

This time, I was looking for a very specific recipe, the ricotta and pear cake for my sister’s in law birthday, and knowing that the cakes with cottage cheese are not among my favorites (I do not like the taste of fresh cheese with sugar), I totally entrusted to the search on the net … that’s how I discovered a wonderful recipe site as  La Ciliegina sulla Torta: clean graphics (yes, just like and I should go for here), delicate and delicious recipes and so on … In short, despite the recipe in question was adapted from”Desserts of the sun” by S. De Riso (and it scares me just thinking, when talented pastry chefs will grant some of their secrets, at least you end up with a disaster in the kitchen, not even remotely resemble the original result!), A little in desperation, a bit for the short time available, I sucked it up and wonder of wonders, this cake was marvelous!

For the recipe I refer you to that site you should go and visit, my only change was almost forced: I did not find any pear brandy over here, and I sharpened the wits to keep the flavor of the pear,  using some organic pear juice, adding a drop of white rum to give some adult taste to the cake (I think that even a drop of brandy would work fine, you decide).

Finally, if you find yourself without the circle to assemble the cake, I used a simple 22 cm cake tin with an opening hook, and assembled the cake as per instructions: it will work perfectly!